ACL权限控制

1. ACL 权限控制

ZooKeeper 基础知识基本分为三大模块:

  • 数据模型
  • Watch 监控
  • ACL 权限控制

在前面已经讲了数据模型Watch 监控,现在来讲一下ACL权限控制。

权限控制相信你一定很熟悉。比如 Linux 系统将对文件的使用者分为三种身份,即 User、Group、Others。使用者对文件拥有读(read) 写(write)以及执行(execute)3 种方式的控制权。这种权限控制方式相对比较粗糙,在复杂的授权场景下往往并不适用。比如下边一个应用场景。
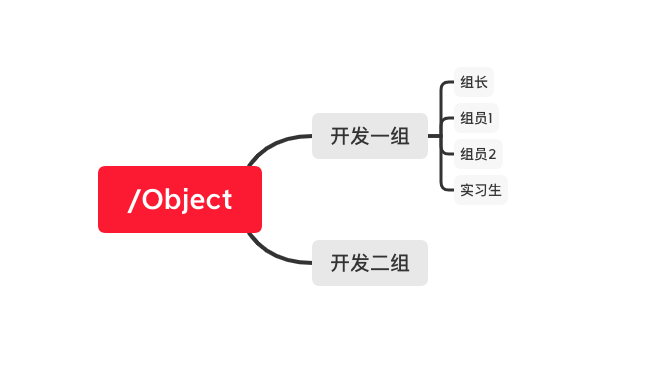
上图如果使用 Linux 权限来设计,则:

首先作为技术组长使用 User 身份,具有读、写、执行权限。项目组其他成员使用 Group 身份,具有读写权限,其他项目组的人员则没有任何权限。这样就实现了满足要求的权限设定了。

但是针对于Zookeeper来说。Zookeeper有临时节点的特性。比如现在新加入一个实习生,他只有熟悉项目的权限,却没有修改项目的能力。则此时使用的权限规则就无法满足要求。

ZooKeeper 中的 ACl 就能应对这种复杂的权限应用场景

2.ACL的使用

ACL 权限设置通常可以分为 3 部分,分别是:权限模式(Scheme)、授权对象(ID)、权限信息(Permission)。最终组成一条例如scheme:id:permission格式的 ACL 请求信息。

2.1 权限模式(Scheme)

权限模式就是用来设置 ZooKeeper 服务器进行权限验证的方式。ZooKeeper 的权限验证方式大体分为两种类型:

  • 范围验证

    ZooKeeper 可以针对一个 IP 或者一段 IP 地址授予某种权限。比如我们可以让一个 IP 地址为“ip:192.168.1.10”的机器对服务器上的某个数据节点具有写入的权限。或者也可以通过“ip:192.168.1.10/22”给一段 IP 地址的机器赋权

  • 口令验证

    也可以理解为用户名密码的方式,这是我们最熟悉也是日常生活中经常使用的模式,比如我们打开自己的电脑或者去银行取钱都需要提供相应的密码。

    在 ZooKeeper 中这种验证方式是 Digest 认证,我们知道通过网络传输相对来说并不安全,所以“绝不通过明文在网络发送密码”也是程序设计中很重要的原则之一,而 Digest 这种认证方式首先在客户端传送username:password这种形式的权限表示符后,ZooKeeper 服务端会对密码 部分使用 SHA-1 和 BASE64 算法进行加密,以保证安全性。另一种权限模式 Super 可以认为是一种特殊的 Digest 认证。具有 Super 权限的客户端可以对 ZooKeeper 上的任意数据节点进行任意操作。下面这段代码给出了 Digest 模式下客户端的调用方式。

    1
    2
    3
    4
    5
    6
    7
    8
    9
    10
    11
    12
    13
    14
    15
    //创建节点

    create /digest_node1

    //设置digest权限验证

    setAcl /digest_node1 digest:用户名:base64格式密码:rwadc

    //查询节点Acl权限

    getAcl /digest_node1

    //授权操作

    addauth digest user:passwd

    最后一种授权模式是 world 模式,其实这种授权模式对应于系统中的所有用户,本质上起不到任何作用。设置了 world 权限模式系统中的所有用户操作都可以不进行权限验证。

2.2 授权对象(ID)

接下来我们再看一下授权对象部分,其实这个很好理解,所谓的授权对象就是说我们要把权限赋予谁,而对应于 4 种不同的权限模式来说,如果我们选择采用 IP 方式,使用的授权对象可以是一个 IP 地址或 IP 地址段;而如果使用 Digest 或 Super 方式,则对应于一个用户名。如果是 World 模式,是授权系统中所有的用户。

2.3 权限信息(Permission)

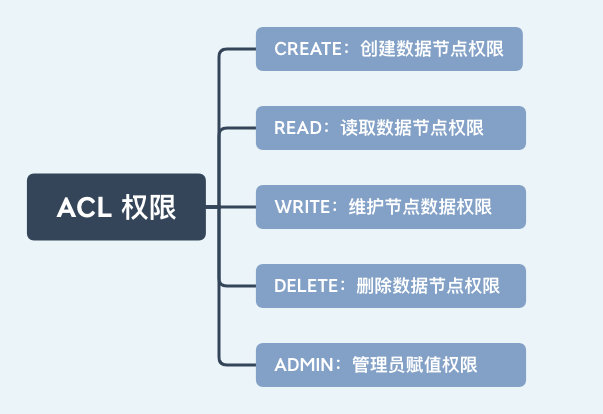
权限就是指我们可以在数据节点上执行的操作种类,如下图所示:在 ZooKeeper 中已经定义好的权限有 5 种:

  • 数据节点(create)创建权限,授予权限的对象可以在数据节点下创建子节点;
  • 数据节点(wirte)更新权限,授予权限的对象可以更新该数据节点;
  • 数据节点(read)读取权限,授予权限的对象可以读取该节点的内容以及子节点的信息;
  • 数据节点(delete)删除权限,授予权限的对象可以删除该数据节点的子节点;
  • 数据节点(admin)管理者权限,授予权限的对象可以对该数据节点体进行 ACL 权限设置。
image

Mark:

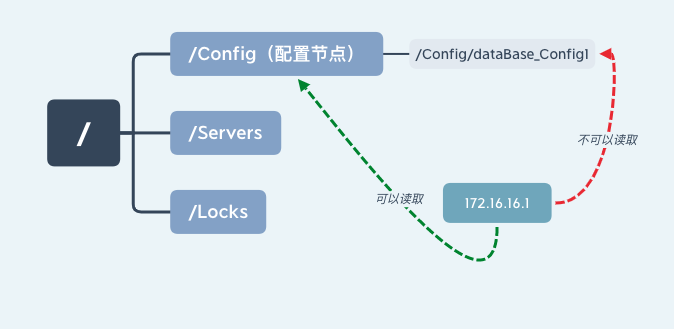
每个节点都有维护自身的 ACL 权限数据,即使是该节点的子节点也是有自己的 ACL 权限而不是直接继承其父节点的权限。如下中“172.168.11.1”服务器有“/Config”节点的读取权限,但是没有其子节的“/Config/dataBase_Config1”权限。
image

2.4 权限扩展

虽然 ZooKeeper 自身的权限控制机制已经做得很细,但是它还是提供了一种权限扩展机制来让用户实现自己的权限控制方式。

官方文档中对这种机制的定义是 Pluggable ZooKeeper Authenication,意思是可插拔的授权机制,从名称上我们可以看出它的灵活性。要想实现自定义的权限控制机制,最核心的一点是实现 ZooKeeper 提供的权限控制器接口 AuthenticationProvider

1
2
3
4
5
6
7
8
9
10
11
12
13
14
15
16
17
18
19
20
21
22
23
24
25
26
27
28
29
30
31
32
33
34
35
36
37
38
39
40
41
42
43
44
45
46
47
48
49
50
51
52
53
54
55
56
57
58
59
60
61
62
63
64
65
66
67
68
69
70
71
72
73
74
75
76
77
78
79
80
81
82
83
84
85
86
87
88
89
90
91
92
public interface AuthenticationProvider {

/**
* The String used to represent this provider. This will correspond to the
* scheme field of an Id.
*
* @return the scheme of this provider.
* 用于表示此提供程序的字符串。这将对应于Id的scheme字段。
*/
String getScheme();

/**
* This method is called when a client passes authentication data for this
* scheme. The authData is directly from the authentication packet. The
* implementor may attach new ids to the authInfo field of cnxn or may use
* cnxn to send packets back to the client.
*
* @param cnxn
* the cnxn that received the authentication information.
* @param authData
* the authentication data received.
* @return TODO
* 当客户端传递此方案的身份验证数据时,将调用此方法。authData直接来自认证报文。实现者可以将新的id附加到cnxn的authInfo字段,也可以使用cnxn将包发送回客户端
*/
KeeperException.Code handleAuthentication(ServerCnxn cnxn, byte[] authData);

/**
* This method is called when admin server command passes authentication data for this
* scheme.
*
* @param request
* the request that contains the authentication information.
* @param authData
* the authentication data received.
* @return Ids
* the list of Id. Empty list means not authenticated
* 当管理服务器命令为此方案传递身份验证数据时,将调用此方法。
*/
default List<Id> handleAuthentication(HttpServletRequest request, byte[] authData) {
return new ArrayList<>();
}

/**
* This method is called to see if the given id matches the given id
* expression in the ACL. This allows schemes to use application specific
* wild cards.
*
* @param id
* the id to check.
* @param aclExpr
* the expression to match ids against.
* @return true if the id can be matched by the expression.
* 调用此方法以查看给定id是否与ACL中的给定id表达式匹配。这允许方案使用特定于应用程序的通配符。
*/
boolean matches(String id, String aclExpr);

/**
* This method is used to check if the authentication done by this provider
* should be used to identify the creator of a node. Some ids such as hosts
* and ip addresses are rather transient and in general don't really
* identify a client even though sometimes they do.
*
* @return true if this provider identifies creators.
* 此方法用于检查此提供程序完成的身份验证是否应用于标识节点的创建者。一些id,如主机和ip地址,是相当短暂的,通常不能真正识别客户端,即使有时它们可以。
*/
boolean isAuthenticated();

/**
* Validates the syntax of an id.
*
* @param id
* the id to validate.
* @return true if id is well formed.
* 验证id的语法。
*/
boolean isValid(String id);

/**
* <param>id</param> represents the authentication info which is set in server connection.
* id may contain both user name as well as password.
* This method should be implemented to extract the user name.
*
* @param id authentication info set by client.
* @return String user name
* 表示在服务器连接中设置的身份验证信息。Id可能包含用户名和密码。应该实现这个方法来提取用户名。
*/
default String getUserName(String id) {
// Most of the authentication providers id contains only user name.
return id;
}

}

实现了自定义权限后,如何才能让 ZooKeeper 服务端使用自定义的权限验证方式呢?接下来就需要将自定义的权限控制注册到 ZooKeeper 服务器中,而注册的方式通常有两种。

第一种是通过设置系统属性来注册自定义的权限控制器:

1
-Dzookeeper.authProvider.x=CustomAuthenticationProvider

另一种是在配置文件 zoo.cfg 中进行配置:

1
authProvider.x=CustomAuthenticationProvider

自定义ACL此处不会详细讲解,感兴趣的盆友可以自己查询相关资料。

3. ACL 内部实现原理

3.1 客户端处理过程

以节点授权 addAuth 接口为例,首先客户端通过 ClientCnxn 类中的 addAuthInfo 方法向服务端发送 ACL 权限信息变更请求,该方法首先将 scheme 和 auth 封装成 AuthPacket 类,并通过 RequestHeader 方法表示该请求是权限操作请求,最后将这些数据统一封装到 packet 中,并添加到 outgoingQueue 队列中发送给服务端。

1
2
3
4
5
6
7
8
9
10
11
12
13
14
15
16
public void addAuthInfo(String scheme, byte[] auth) {
if (!state.isAlive()) {
return;
}
authInfo.add(new AuthData(scheme, auth));
queuePacket(
new RequestHeader(ClientCnxn.AUTHPACKET_XID, OpCode.auth),
null,
new AuthPacket(0, scheme, auth),
null,
null,
null,
null,
null,
null);
}

queuePacket( RequestHeader h, ReplyHeader r, Record request, Record response, AsyncCallback cb, String clientPath, String serverPath, Object ctx, WatchRegistration watchRegistration, WatchDeregistration watchDeregistration)

这个方法我们在讲Watcher机制的时候讲过,就是讲数据封装到packet中,然后添加到outgoingQueue队列中发送给服务端。

3.2 服务端实现过程

相比于客户端的处理过程,服务器端对 ACL 内部实现就比较复杂,当节点授权请求发送到服务端后,在服务器的处理中首先调用 readRequest()方法作为服务器处理的入口,其内部只是调用 processPacket 方法。

NIOServerCnxn:

1
2
3
4
5
6
protected void readRequest() throws IOException {
RequestHeader h = new RequestHeader();
ByteBufferInputStream.byteBuffer2Record(incomingBuffer, h);
RequestRecord request = RequestRecord.fromBytes(incomingBuffer.slice());
zkServer.processPacket(this, h, request);
}

而在 processPacket 方法的内部,首先反序列化客户端的请求信息并封装到 AuthPacket 对象中。之后通过 getServerProvider 方法根据不同的 scheme 判断具体的实现类。

1
2
3
4
5
6
7
8
9
10
11
12
13
14
15
16
17
public void processPacket(ServerCnxn cnxn, RequestHeader h, RequestRecord request) throws IOException {
... ...
if (h.getType() == OpCode.auth) {
... ...
AuthPacket authPacket = request.readRecord(AuthPacket::new);
String scheme = authPacket.getScheme();
ServerAuthenticationProvider ap = ProviderRegistry.getServerProvider(scheme);
Code authReturn = KeeperException.Code.AUTHFAILED;
if (ap != null) {
authReturn = ap.handleAuthentication(
new ServerAuthenticationProvider.ServerObjs(this, cnxn),
authPacket.getAuth());
... ...
}
}
... ...
}

authReturn == KeeperException.Code.OK表明权限验证成功。

3.3 Digest 模式验证

这里我们使用 Digest 模式为例,因此该实现类是 DigestAuthenticationProvider 。之后调用其 handleAuthentication() 方法进行权限验证。如果返 KeeperException.Code.OK 则表示该请求已经通过了权限验证,如果返回的状态是其他或者抛出异常则表示权限验证失败。

1
2
3
4
5
6
7
8
9
10
public KeeperException.Code handleAuthentication(ServerCnxn cnxn, byte[] authData) {
final List<Id> ids = handleAuthentication(authData);
if (ids.isEmpty()) {
return KeeperException.Code.AUTHFAILED;
}
for (Id id : ids) {
cnxn.addAuthInfo(id);
}
return KeeperException.Code.OK;
}

handleAuthentication

1
2
3
4
5
6
7
8
9
10
11
12
13
14
private List<Id> handleAuthentication(final byte[] authData) {
final List<Id> ids = new ArrayList<>();
final String id = new String(authData);
try {
final String digest = generateDigest(id);
if (digest.equals(superDigest)) {
ids.add(new Id("super", ""));
}
ids.add(new Id(getScheme(), digest));
} catch (final NoSuchAlgorithmException e) {
LOG.error("Missing algorithm", e);
}
return Collections.unmodifiableList(ids);
}

4.addAuthInfo

重点讲解一下 addAuthInfo 函数,其作用是将解析到的权限信息存储到 ZooKeeper 服务器的内存中,该信息在整个会话存活期间一直会保存在服务器上,如果会话关闭,该信息则会被删,这个特性很像我们之前学过的数据节点中的临时节点

经过上面的步骤,服务器已经将客户端 ACL 请求解析并将对应的会话权限信息存储在服务器上,下面我们再看一下服务器是如何进行权限验证的。

首先,在处理一次权限请求时,先通过 PrepRequestProcessor 中的 checkAcl 函数检查对应的请求权限,

  • 如果该节点没有任何权限设置则直接返回

  • 如果该节点有权限设置则循环遍历节点信息进行检查

如果具有相应的权限则直接返回表明权限认证成功,否则最后抛出 NoAuthException 异常中断操作表明权限认证失败。

1
2
3
4
5
6
7
8
9
10
11
12
13
14
15
16
17
static void checkACL(...){

...

for (ACL a : acl) {

if(authId.getScheme().equals(id.getScheme()..){

return;

}

}

throw new KeeperException.NoAuthException();

}

5.总结

到目前为止我们对 ACL 权限在 ZooKeeper 服务器客户端和服务端的底层实现过程进行了深度的分析。总体来说,客户端在 ACL 权限请求发送过程的步骤比较简单:首先是封装该请求的类型,之后将权限信息封装到 request 中并发送给服务端。而服务器的实现比较复杂,首先分析请求类型是否是权限相关操作,之后根据不同的权限模式(scheme)调用不同的实现类验证权限最后存储权限信息。本课时的例子采用了授权接口 addAuth 而没有采用权限设置接口 setAcl,是因为权限设置接口相对简单,其核心功能点已经包括在授权接口实现中。而在授权接口中,值得注意的是会话的授权信息存储在 ZooKeeper 服务端的内存中,如果客户端会话关闭,授权信息会被删除。下次连接服务器后,需要重新调用授权接口进行授权。

6.🍪

如果一个客户端对服务器上的一个节点设置了只有它自己才能操作的权限,那么等这个客户端下线或被删除后。对其创建的节点要想进行修改应该怎么做呢?

我们可以通过“super 模式”即超级管理员的方式删除该节点或变更该节点的权限验证方式。正因为“super 模式”有如此大的权限,我们在平时使用时也应该更加谨慎。

8.Read more

:lollipop::ACL 权限控制


博客说明

文章所涉及的资料来自互联网整理和个人总结,意在于个人学习和经验汇总,不用于任何的商业用途。如有侵权,请联系本人删除。谢谢!


ACL权限控制
https://nanchengjiumeng123.top/2022/09/14/framework/zookeeper/2022-09-14_ACL权限控制/
作者
Yang Xin
发布于
2022年9月14日
许可协议